Dunnet Head Drone

Dunnet Head Drone

This great Scottish summer, I did a small road-trip to the highlands with a few friends and my trusty hexacopter.

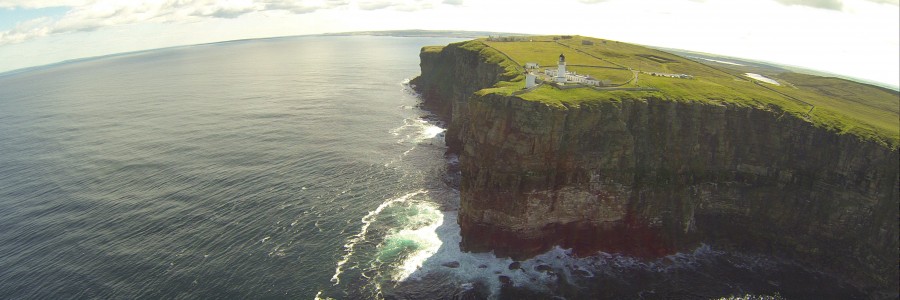
We did a stop in a place called Dunnet Head, which is a peninsula in Caithness, on the north coast of Scotland, that includes the most northerly point of the mainland of Great Britain. Its has an awesome cliff which is only possible to see if you’re in a boat or using a drone 😉

It was close to 11 am, I started to get my vehicle ready, the weather was almost perfect, sun, no rain and just 17 kph of wind speed (the highest wind speed I have tried is 22 kph…). But of course… I was about to fly above the Atlantic Ocean!!! any wind speed is undesirable.

IMG_3181
17.1 kph wind speed

This mission is without doubt the most risky one I have ever done, the problem involved here is that if something failed, a prop, GPS, a ESC, whatever… my vehicle was not going to just crash, it was going to be lost FOREVER. There is no way to get down that cliff (with no equipment) and by the time I could reach it in a boat, maybe it was 20-30 meters underwater, so, if there is fail, is game over.

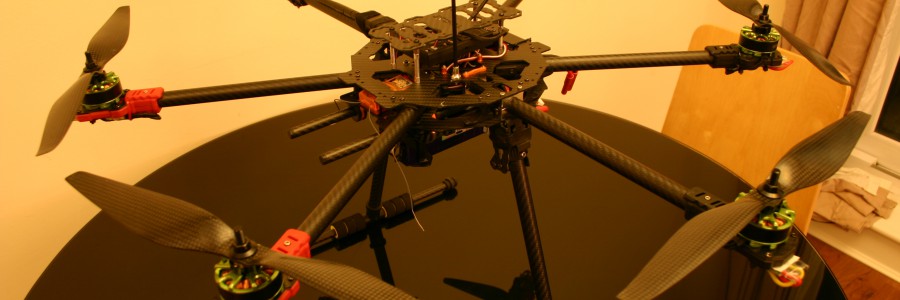
Then why do I do this? you must think… Is just because I like to test my vehicles to the maximum and I trust them. Oh, by the way, I build this one, is not just a 1000 usd DJI Phathom thing… Its a vehicle I have dedicated hours and hours of designing, building and testing, this was the vehicle’s ultimate test.

Hexacopter ready to fly (props folded)

The vehicle is almost everything in carbon fibre, and you can see the specifications here. A interesting fact about this one is that is using foldable props of 12 in, the usual size for this type of propeller is 15in.

So, I had my crew (The gang) to help me doing crowd control and warn me of some danger that me as a pilot cannot see easily. Thanks Tania, Dalila and Rob you guys rock!

I did a, what I thought, it was going to be a small automatic mission, because is easier for the vehicle to do a nice flight that me being at 300 meters away with no FPV gear. The mission was approximate 900 meters in total length and it was going to be done in 5 min.

Mission analysis

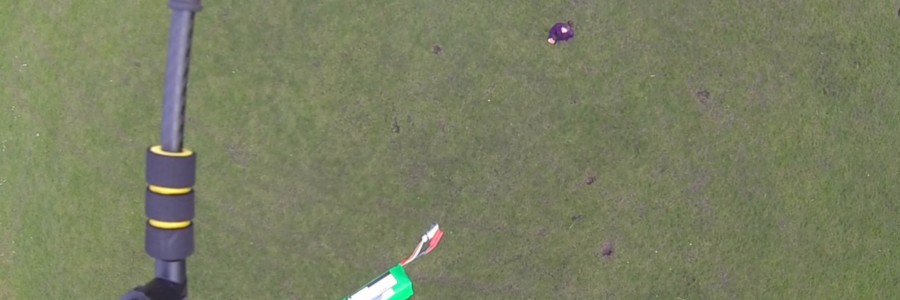
After do pre-flight tests, and check connections and the vehicle overall, the take off was very sweet and controlled. Loiter was holding great against the wind. I switch to stabilise and started to fly myself outside of the safe area (away from the cliff’s land) this was in order to take care of the possible big wind gusts in the edge of the cliff. Everything went great. Started to do some loitering to take nice videos, 360s and tilted the gimbal to see the danger under the vehicle (don’t forget to check the video).

IMG_0440
Going on automatic mode

The automatic mission started, I was checking how was performing with the telemetry link to my tablet, first WP’s went great, it started to turn towards Orkney and then… I heard my tablet saying “Mode Land”!!!

Of course that mode takes time and goes down very slow, and the pilot can override it by switching modes, at that moment I knew the mission was over and the next thing to do is get it back safely. I switched modes to stabilise and by checking the heading on my tablet to make it point towards me, I did full pitch forward… The vehicle was 363 meters away from me, I could barely see it, my tablet was super helpful. At the end I was able to bring it back safely and I actually continued flying until the battery was almost dry.

The logs showed that there was a EKF variance (Extended Kalman Filter) which is being used as the primary source for attitude and position estimates. This check will trigger when the EKF’s compass and velocity “variance” are higher than an specific value, and this is what happened. The vehicle was flying in a mode that requires GPS (Auto) so the vehicle will switch to “pilot controlled” LAND… not very cool in this kind of situations.

cartodb1
Actual GPS log from the entire flight
photo_2015-08-15_21-38-17
EKF variance
IMG_4423
My friends after the successful flight

The vehicle performed excellently (except for that variance…) and I was able to get very nice footage to show it to you guys, my readers. So, please check the next video and enjoy:

Dropping wrong payload

Dropping wrong payload

While doing some tests with my hexacopter at 20 meters of altitude, my incorrectly secured enormous battery failed at being part of the vehicle and decided to plummet down towards earth at impressive speed, the hexacopter of course was trying to catch the battery, but only did it when they where both at the ground.

An excellent example of a face-palm moment.

Secure your batteries properly, and remember to fly safe!


NoIR camera onboard drone

NoIR camera onboard drone

The RPI (Raspberry Pi) camera is a great module (and cheap) to be playing about with… I have in specific a PI NoIR camera, which is the same as the camera module, with the modification of not having an infrared filter, which will make the photos/videos look decidedly curious.

I want to use this camera to do some NDVI geo-maps at a affordable price tag, and also because is fun.

What is NDVI?

NDVI stands for Normalised Difference Vegetation Index. Live green vegetation absorbs visible light (solar radiation) as part of photosynthesis. At the same time plants scatter (reflect) solar energy in the near infrared. This difference in absorption is quite unique to live vegetation and provides a measure of the greenness of the vegetation.

NDVI is an index which measures this difference, providing a measure of vegetation density and condition. It is influenced by the fractional cover of the ground by vegetation, the vegetation density and the vegetation greenness. It indicates the photosynthetic capacity of the land surface cover. Its value is always between -1 and +1. Higher values are associated with greater density and greenness of the plant canopy, soil and snow values are close to zero, while water bodies have negative values.

Modifying the PI NoIR camera lens

The standard lens provided in the camera is not good for my application, therefore I need to change the lens, the camera module will match with the sizes of CCTV cameras, and you can get different lenses ranging from $10 – $20 USD, maybe even more if you get one with auto focus… I’m using a standard zoom lens of 16mm.

The process is as follows:

  • Remove the cable from the camera module, then
  • Remove the lens connector (yellowish ribbon with “sunny A1014” info)
  • Peal the lens assembly off the board (its only stuck on with an adhesive pad)
  • Unscrew the lens from the assembly
  • Place the body of the CCTV lens in the camera module (don’t touching the array and don’t get dust into the module sensor, its exposed!)
  • Use screws to secure the CCTV lens (they do not exactly match, but it can be done carefully…)
  • Screw new lens on the CCTV base receptor
  • Use “raspivid -t 0” to adjust the zoom (screw or unscrew) until you see a sharp image…

Its important to notice that depending on the zoom size, the adjusting in the last step will only work (be sharp) at certain distances… My setup work’s from 8-20 meters, if out of that range the images will look blurry.

We also designed (my outstanding designer girlfriend and me :P) a GoPro mockup to be able to fit this camera on any standard GoPro gimbal laying around. My Tarot T-2D works awesome for this step:

Mounted on Tarot T-2D gimbal
Alduxhexa with NoIR ready to fly

Then I proceeded to make a small shell script to record videos using the great raspivid command, here you go:

[bash title=”Record timestamped videos using raspivid”]
#!/bin/bash
echo "Starting recording…"
sleep 2
while true ; do
DATE=$(date +"%d_%H_%M_%S")
if raspivid -o /home/pi/videos/$DATE.mp4 -w 1280 -h 720 -n -t 100000 -vf ; then
echo "Video "$DATE".mp4 saved"
else
exit
fi
done
[/bash]

I’m recording timestamped videos with duration of 100 seconds, just in case power goes or something fails, its better to have something than not having videos… You don’t need the echos but they help when you’re debugging. Using this script running every time the rpi boots up, you will end up with very nice videos, similar to this next video:


AlduxHexa

AlduxHexa

The “Big boy“…

Able to carry 4kg of payload and still fly for 10 min. Very fun to fly, very dangerous.

  • 740kv, 550watts Multistar motors.
  • 13 in carbon fiber props, t-style
  • 30amps simonk ESC
  • APM, PX4 and Pixhawk being tested on this frame
  • Tarot 680 carbon fiber frame

Endurance tests (new…):

  • 8000 mah 4s 10C Lipo (brand new battery) -> 21:47 minutes
  • 5000 mah 4s 45-90C Lipo (used battery) -> 10:53 minutes


Videos: