
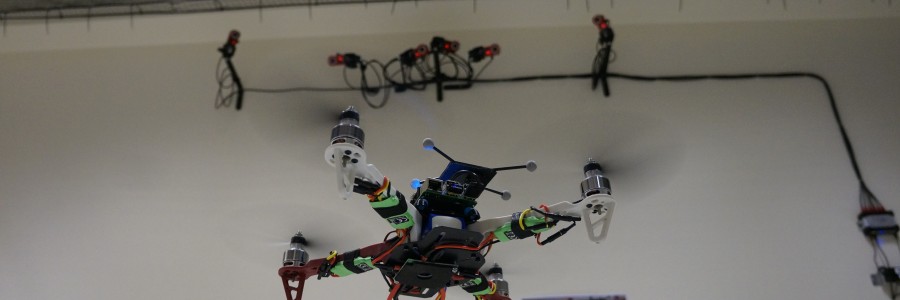
We all love drones, and we love to just buy one and go outside and make it fly by itself, this is great. But what is actually going on inside the drone? In this post I’m going to explain a bit how a loiter controller works, with the difference is that I’ll show my controller, share the python code and that I’m using a motion capture system inside my lab. The great MAST Lab.
First things first, you can check the code here. And secondly, I need to explain our setup.
We are using Altax Flight Stack which is a tuple of computers connected with each other and sharing information. The flight controller is a very cheap naze32, running baseflight (but cleanflight will work as well), and the companion computer is a Raspberry Pi (any version will do the work…). The entire script does not consume too much CPU.
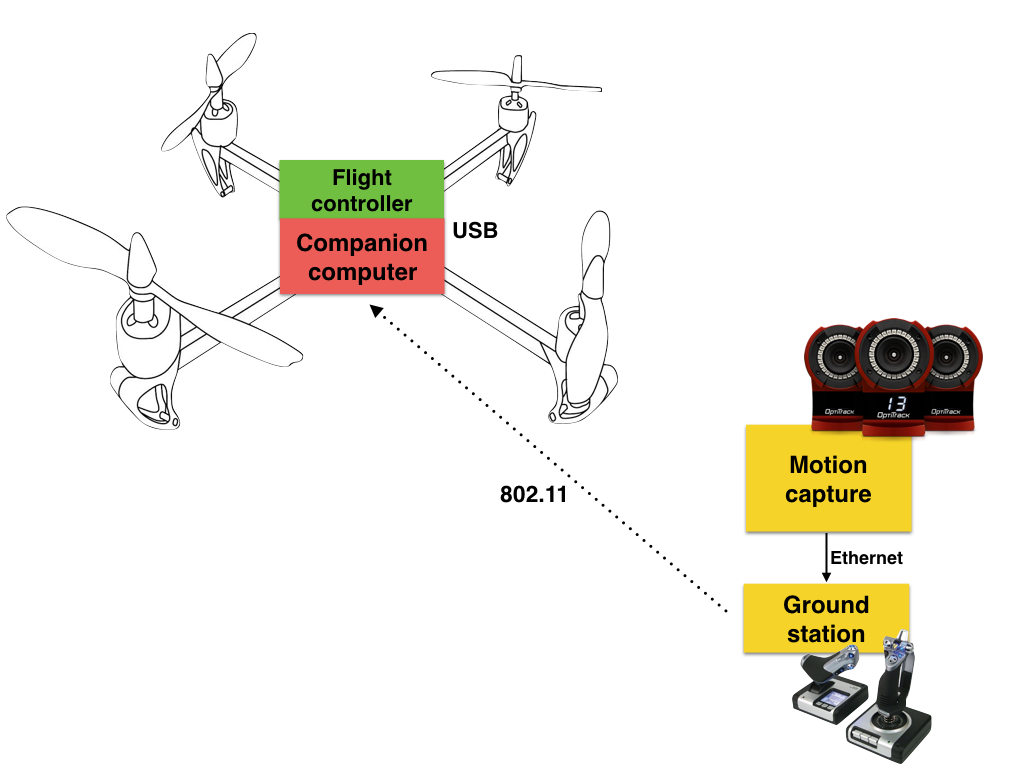
The connection diagram is showed above, the motion capture system is connected to a desktop computer and this computer sends the mocap data and the joystick information via a common wireless network (UDP), this information is used by the raspberry pi to know the position and attitude of the vehicle, then the rpi calculates a set of commands (roll angle, pitch angle, yaw rate and throttle) using simplistic PID controllers and then it sends the information to the flight controller.
This outer loop control is working at 100hz, but it can be configured to go slower.
Important to notice that we have crashed lots of times when starting to test/debug this system. Most of the crashes are due to the desktop computer “hanging out”… then the vehicle stops receiving the information and will keep the last command. A auto-landing feature is needed, this feature will be added on version 2.
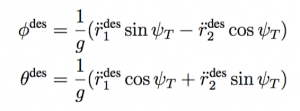
In the part of the control, we are using angle mode on the inner loop (naze32) and then we calculate the appropriate angle commands (pitch and roll) from desired accelerations (outputs of the controllers) to make the vehicle hold the commanded position in the space.
The most important part of the code is when we calculate desired angle commands from the desired accelerations coming from the PID controllers:

And the proper math:
The rest of the code is just to deal with data, vehicle and make everything work on threads. One thread for the control and another for receiving the data.
The code is extremely easy to understand and to tweak (I hope…). With this setup, the joystick is the one that activates the automatic behavior, if the proper switch is on manual, then you will be able to fly the vehicle using the joystick.
This is by no means the same technique used by Pixhawk in loiter mode. But perhaps is a nice way to start learning about flight modes (and controlling aerial vehicles) so that then you can learn how advanced flight modes developed by the team of PX4 and 3DR work.
The video is here:
More pictures:


Many thanks to my good friend Murray to help me develop the controller, also to my {friend/lab assistant} Kyle and my great {students/camera operators} Hunter and Kenny.
Hello there, just became aware of your blog through Google,
and found that it is truly informative. I am going
to watch out for brussels. I will appreciate if you continue this in future.
A lot of people will be benefited from your writing. Cheers!
Escape room
You have remarked very interesting details! ps nice internet site..
You’ve made some good points there. I looked on the net for more info about the issue and found most individuals will go along with your views on this website.
I quite like looking through an article that can make men and women think. Also, thank you for allowing for me to comment.
I needed to thank you for this very good read!! I definitely enjoyed every little bit of it. I have you saved as a favorite to look at new stuff you post…
You have made some decent points there. I looked on the internet for more info about the issue and found most people will go along with your views on this site.
Hi! I simply would like to offer you a big thumbs up for the excellent information you have got right here on this post. I will be returning to your website for more soon.
I have to thank you for the efforts you have put in penning this site. I am hoping to see the same high-grade blog posts by you in the future as well. In fact, your creative writing abilities has inspired me to get my very own website now 😉
Good post. I will be going through many of these issues as well..
Hi! I just would like to give you a huge thumbs up for your excellent info you have right here on this post. I am coming back to your web site for more soon.
I wanted to thank you for this great read!! I absolutely enjoyed every bit of it. I have got you book marked to check out new things you post…
This is the perfect web site for anybody who wants to find out about this topic. You realize a whole lot its almost tough to argue with you (not that I really will need to…HaHa). You definitely put a brand new spin on a subject that has been discussed for a long time. Great stuff, just great.
I blog frequently and I genuinely appreciate your information. Your article has really peaked my interest. I am going to bookmark your website and keep checking for new information about once per week. I opted in for your Feed as well.
You ought to take part in a contest for one of the greatest sites on the web. I’m going to highly recommend this website!
Hello there! I could have sworn I’ve been to this website before but after going through a few of the articles I realized it’s new to me. Anyhow, I’m certainly happy I came across it and I’ll be book-marking it and checking back regularly!
I blog often and I genuinely appreciate your information. Your article has really peaked my interest. I will book mark your blog and keep checking for new details about once per week. I subscribed to your Feed as well.
Having read this I thought it was very enlightening. I appreciate you spending some time and energy to put this information together. I once again find myself personally spending a significant amount of time both reading and posting comments. But so what, it was still worthwhile.